
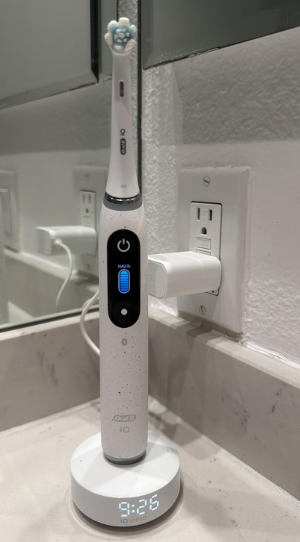
The Oral-B iO Series 10 may look like an ordinary electric toothbrush at first glance, but once we switch it on, it quickly becomes clear that this is not a basic brush. Between its colour display, pressure sensor, seven cleaning modes, Bluetooth connectivity, artificial-intelligence tracking, and iO Sense smart charger, there is quite a lot happening beneath that sleek handle.
That technology can be helpful, but it can also make the first brushing session feel slightly overwhelming. Which button changes the mode? What do the coloured lights mean? Are we supposed to scrub our teeth or simply guide the brush? And what exactly is the smart charger trying to tell us?
Fortunately, learning how to use the Oral-B iO Series 10 is much easier than its long feature list suggests. Once we understand the basic controls and brushing technique, using it becomes almost automatic.
In this guide, we will walk through the entire process, from charging and installing the brush head to selecting a mode, interpreting the iO Sense charger, connecting the mobile application, cleaning the handle, and avoiding the most common mistakes.
What Comes With the Oral-B iO Series 10?
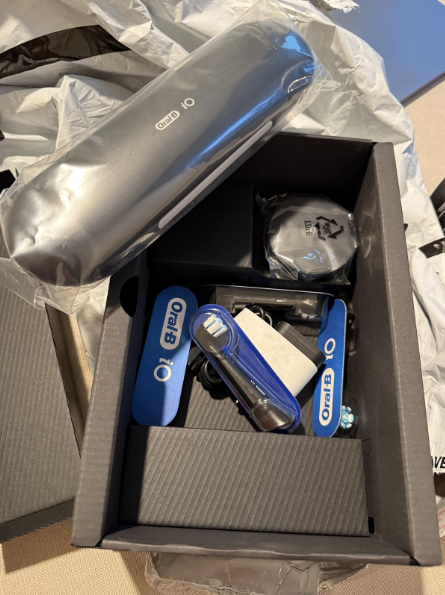
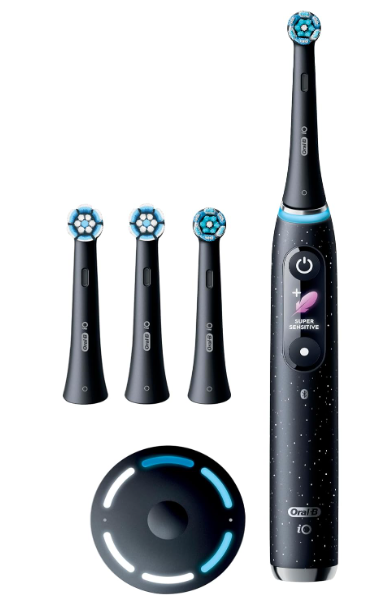
The precise contents can vary slightly depending on the country, retailer, colour, or special-edition package. However, a standard Oral-B iO Series 10 package normally includes several essential components:
- Oral-B iO Series 10 toothbrush handle
- One or more compatible iO brush heads
- iO Sense smart charging base
- Power adapter
- Charging travel case or standard travel case, depending on the bundle
- Brush-head holder
- User documentation
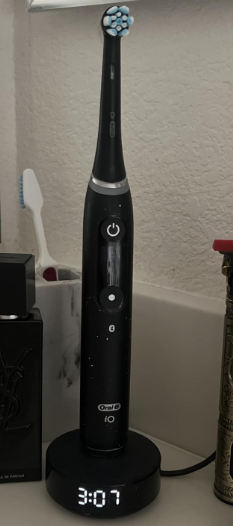
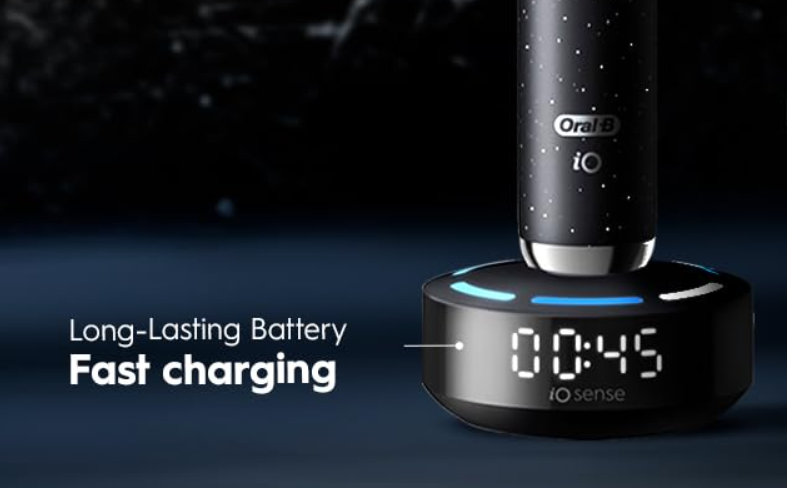
The most distinctive accessory is the iO Sense charger. Unlike a conventional charging stand that simply supplies power, this base can provide visible feedback about brushing time, pressure, and mouth coverage.
Oral-B describes the iO Sense charger as a real-time coaching system designed to guide users on coverage, pressure, and brushing duration.
Understanding the Two Buttons
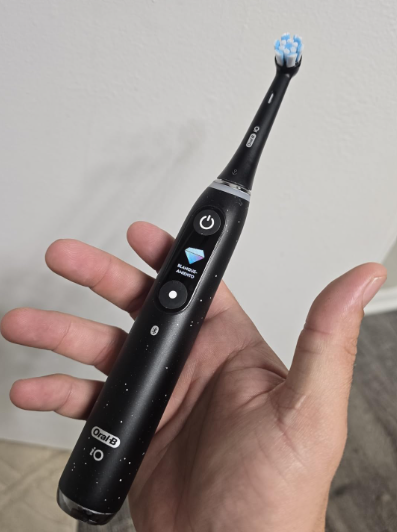
The Series 10 handle has two main controls.
The upper button is the power or confirmation button. We use it to:
- Turn the toothbrush on
- Turn the toothbrush off
- Confirm menu selections
- Enter selected settings
The lower button is generally used to:
- Move through brushing modes
- Navigate the display menus
- Open or cycle through settings
The colour display between the buttons shows the active mode, battery information, timer details, reminders, greetings, and other status messages.
Why the Display Matters
The display is not merely decorative. It acts like a tiny dashboard for the toothbrush.
It can tell us:
- Which brushing mode is selected
- When the battery needs charging
- How long we have brushed
- Whether the brush head may need replacing
- Whether a brushing session was completed
- Whether the handle is connected or ready to connect
Once we become familiar with the symbols, we rarely need to open the mobile application just to perform an ordinary brushing session.
How to Charge the Oral-B iO Series 10
Before using the brush for the first time, it is sensible to charge it fully.
Place the iO Sense charger on a dry, stable, level surface near a suitable electrical outlet. Connect the charger to power, then position the toothbrush handle upright on the magnetic base.
The handle should settle into place naturally. There is no need to press it down or twist it.
Oral-B states that the iO Series 10 can reach a full charge in approximately three hours. When fully charged, the indicator may remain illuminated briefly before switching off.
Can We Leave It on the Charger?
The toothbrush is designed for regular use with its charging system, so leaving it on the stand between brushing sessions is generally convenient.
However, the charger should remain in a clean, ventilated area. We should avoid placing it where water constantly pools around the base.
Think of the charger as a bedside table for the toothbrush: it should be easy to reach, but it should not live in a puddle.
What If the Toothbrush Does Not Charge?
If the handle does not appear to charge:
- Check that the electrical outlet works.
- Reconnect the power adapter.
- Centre the handle correctly on the charger.
- Clean and dry the bottom of the handle.
- Allow the handle to remain on the base for at least 30 minutes.
- Try another compatible outlet.
A deeply discharged battery may not respond immediately. Giving the brush a little time on the charger can sometimes solve the problem.
How to Install the Brush Head
The Oral-B iO Series 10 requires Oral-B iO-compatible replacement heads. Traditional Oral-B heads intended for older oscillating models are not designed to fit the iO handle correctly.
To attach the brush head:
- Hold the handle upright.
- Align the opening at the bottom of the brush head with the metal drive shaft.
- Push the head gently onto the handle.
- Stop when it sits securely in position.
A small gap between the brush head and handle may be normal. We should not force the head downward in an attempt to eliminate every visible millimetre of space.
How Often Should the Brush Head Be Replaced?
Oral-B recommends replacing an iO brush head about every three months for the best results. Earlier replacement may be necessary if the bristles become frayed, spread outward, feel unusually soft, or lose their original shape.
Replacement timing also depends on use. Someone who brushes firmly or three times per day may wear a head faster than someone using gentle pressure twice daily.
Signs That the Brush Head Is Worn Out
Consider replacing the head when:
- Bristles are bent or widely separated
- The bristle colour has noticeably faded
- The head no longer feels effective
- Plaque seems harder to remove
- The toothbrush displays a replacement reminder
- The head has been used after an illness and replacement has been advised
A tired brush head is like a worn kitchen sponge. It may still move, but it does not work as efficiently as it once did.
How to Use the Oral-B iO Series 10 Step by Step
Once the brush is charged and the head is attached, the actual brushing process is straightforward.
Step 1: Wet the Brush Head Lightly
We can briefly wet the bristles under the tap. This is optional, but many users find it more comfortable.
Avoid soaking the handle or allowing toothpaste to accumulate around the joint between the handle and brush head.
Step 2: Apply a Small Amount of Toothpaste
Place a pea-sized amount of fluoride toothpaste on the bristles.
More toothpaste does not automatically mean cleaner teeth. An oversized stripe often produces excessive foam, which can make us spit too early or shorten the brushing session.
Step 3: Put the Brush in the Mouth Before Turning It On
Position the brush head against the teeth before pressing the power button.
This simple habit prevents toothpaste from flying across the mirror like confetti.
Step 4: Select the Desired Brushing Mode
Use the lower button to move through the available modes. When the desired mode appears on the display, press the upper button to confirm or begin brushing.
The Series 10 offers multiple modes intended for different preferences and oral-care goals.
Step 5: Guide the Brush Slowly
Rest the round brush head against one tooth at a time and guide it gradually along the gumline.
We do not need to scrub aggressively. The toothbrush provides the cleaning motion. Our job is to position and guide it.
Oral-B’s usage guidance advises users to guide the brush as it cups each tooth rather than using a manual scrubbing motion.
Move across:
- Outer tooth surfaces
- Inner tooth surfaces
- Chewing surfaces
- Rear molars
- Gumline edges
Pause briefly on each tooth before moving to the next.
Step 6: Follow the Two-Minute Timer
Aim to brush for at least two minutes unless a dental professional has given different instructions.
A simple approach is to divide the mouth into four sections:
- Upper right
- Upper left
- Lower right
- Lower left
Spend approximately 30 seconds in each quarter.
The iO Series 10 display and charger can help monitor brushing duration so we do not have to count in our heads.
Step 7: Watch the Pressure Sensor
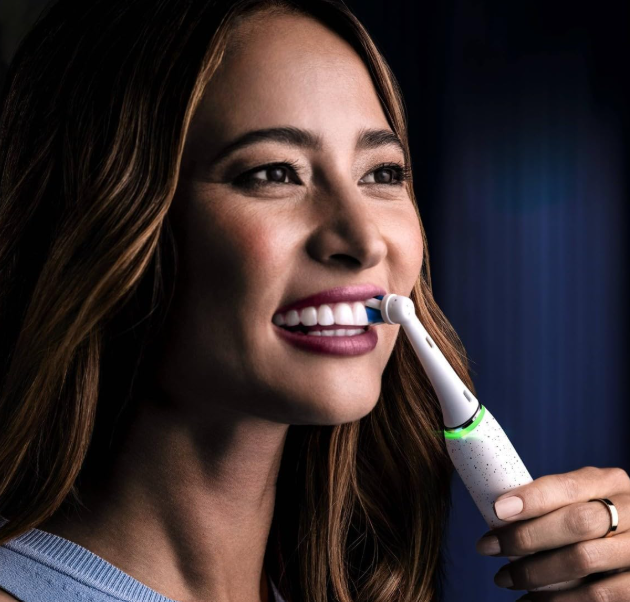
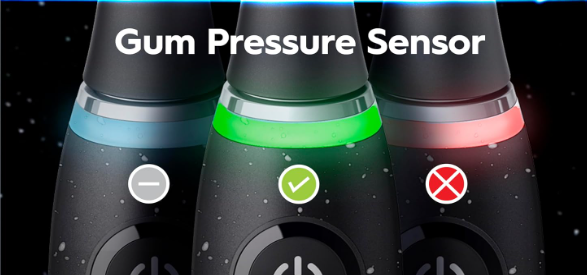
The illuminated ring near the top of the handle provides pressure feedback.
In normal use:
- Green generally indicates suitable pressure.
- Red indicates excessive pressure.
- Another colour may indicate pressure that is too light, depending on the selected feedback configuration.
When too much pressure is applied, the brush may slow automatically while the handle and iO Sense charger display a red warning.
If the ring turns red, loosen the grip and allow the brush to rest more gently against the teeth.
Step 8: Spit, Rinse, and Clean the Brush
After brushing:
- Turn the handle off before removing it from the mouth.
- Spit out the toothpaste.
- Follow your dental professional’s advice regarding mouth rinsing.
- Remove the brush head.
- Rinse the head and handle separately.
- Shake away excess water.
- Store both parts upright to dry.
How Hard Should We Press?
One of the biggest mistakes people make with an electric toothbrush is assuming that greater force creates a deeper clean.
It does not.
The round iO head, oscillating movement, and micro-vibrations perform the mechanical work. Pressing hard can flatten the bristles, reduce their ability to reach around the tooth, and irritate sensitive gums.
Use a relaxed grip. Holding the handle with the fingertips rather than clenching it in a fist can make pressure easier to control.
Let the Sensor Train Us
At first, we may see the red warning frequently. That does not necessarily mean anything is wrong with the toothbrush. It often means we have carried over our manual-toothbrush habits.
After several days, the sensor begins to act like a quiet coach. We naturally learn to lighten our touch.
Should the Brush Head Touch the Gums?
The bristles should reach the gumline gently, but we should not drive the head into the gums.
Angle and placement matter more than force. Let the edge of the brush head clean where the tooth meets the gum while the pressure sensor remains in the appropriate range.
Oral-B iO Series 10 Brushing Modes Explained
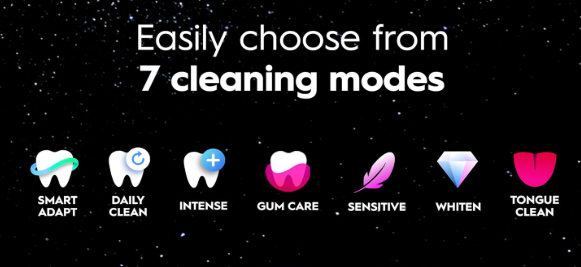
Mode names may vary slightly by market or software version, but the iO Series 10 is generally promoted with seven cleaning settings.
Daily Clean
Daily Clean is the all-purpose mode for routine brushing.
It suits most users and makes a sensible starting point when we are learning the toothbrush.
Use it for:
- Normal morning brushing
- Evening brushing
- Everyday plaque removal
- General oral maintenance
Sensitive
Sensitive mode offers a gentler experience.
It may suit people who:
- Are moving from a manual toothbrush
- Have mildly sensitive teeth
- Find Daily Clean too intense
- Have recently undergone dental treatment and have permission to brush
Super Sensitive
Super Sensitive provides an even softer brushing sensation.
This mode can be helpful when the mouth feels tender, although persistent sensitivity, bleeding, or pain should be discussed with a dental professional rather than hidden indefinitely behind a gentler setting.
Gum Care
Gum Care is intended to provide gentle stimulation along the gumline.
Move slowly and maintain light pressure. The aim is not to massage the gums forcefully but to clean the tooth-gum boundary carefully.
Whitening
Whitening mode changes the brushing pattern to focus on polishing tooth surfaces and helping remove some external stains.
It cannot change the natural internal colour of the teeth in the same way as professional or peroxide-based whitening treatments. Think of it as polishing a window rather than replacing the glass.
Intense Clean
Intense Clean provides a more powerful-feeling session.
It may appeal to experienced electric-toothbrush users who enjoy a stronger sensation, but stronger does not mean we should apply more pressure.
The red sensor remains our warning sign.
Tongue Clean
Tongue Clean is designed for cleaning the tongue for a shorter period.
Place the brush lightly toward the back of the tongue and guide it forward. Avoid pushing so far back that it causes discomfort or gagging.
How to Use the iO Sense Smart Charger
The iO Sense charger is the main feature separating the Series 10 from many other iO models.
It combines magnetic charging with visual coaching.
What the Charger Tracks
During brushing, the charger can provide guidance related to:
- Brushing time
- Pressure
- Mouth coverage
- Progress through different mouth zones
This allows us to receive live feedback without staring at a smartphone screen beside the sink.
Understanding the Six Coverage Zones
The charger uses illuminated sections to represent broad areas of the mouth.
As we brush each area sufficiently, its corresponding light changes or completes. The objective is to finish all represented zones rather than repeatedly polishing only the easy front teeth.
The charger does not replace good technique. It is still possible to “complete” a region while missing a tooth surface, so we should continue moving systematically across inner, outer, and chewing surfaces.
Where Should the Charger Be Positioned?
Place the iO Sense base:
- On a flat surface
- Within comfortable viewing distance
- Away from pooled water
- Near a safe power outlet
- Where the handle can communicate with it reliably
Do not hide it behind bottles or place it where we cannot see the indicators. That would be like buying a satnav and storing it in the glove box while driving.
Can We Brush Without the Smart Charger?
Yes. The toothbrush can still operate using its handle, timer, display, pressure sensor, and saved settings when we are away from the iO Sense charger.
The charger improves real-time feedback, but it is not required for the motor to run.
This is useful when travelling. We can take the brush and travel case without transporting the entire bathroom setup.
How to Connect the Oral-B iO Series 10 to the App
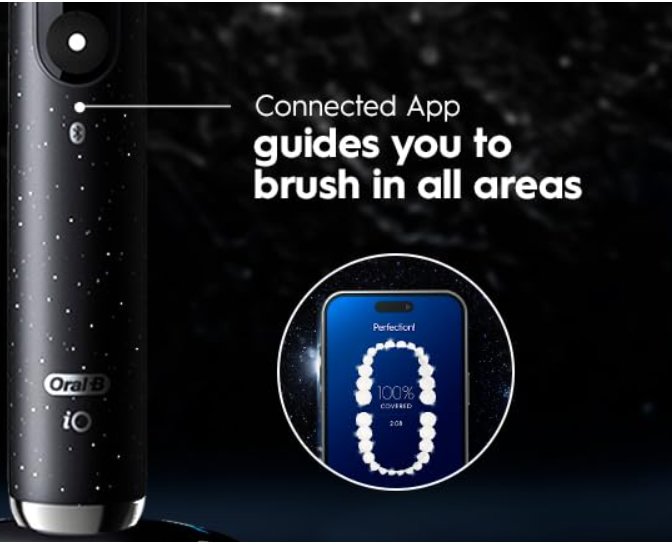
The Oral-B mobile application provides more detailed brushing information, guided routines, session history, and personalised feedback.
Before Pairing
Make sure:
- Bluetooth is enabled on the phone
- The Oral-B application is installed
- The toothbrush has enough battery power
- The phone is close to the handle
- The toothbrush is not already actively connected to another phone
Pairing Steps
The exact screen sequence may change as the application is updated, but the usual process is:
- Download and open the Oral-B application.
- Create an account or continue through the available setup.
- Choose the option to add or connect a toothbrush.
- Wake the Series 10 by pressing a button.
- Follow the pairing instructions on the phone.
- Approve Bluetooth permissions when requested.
- Complete any introductory setup.
The handle’s settings can also be accessed by cycling to the settings menu with the lower button and selecting it using the upper power button.
Do We Need the App Every Day?
No.
The app is useful when learning coverage, monitoring habits, or working toward a specific routine. However, the iO Sense charger provides enough immediate guidance that many users will not want to bring a phone into every brushing session.
A practical approach is to use the app regularly during the first few weeks, then open it occasionally to review progress.
What If the Brush Will Not Connect?
Try the following:
- Turn Bluetooth off and on
- Close and reopen the application
- Wake the toothbrush handle
- Move the phone closer
- Remove an old toothbrush pairing from the application
- Restart the phone
- Check application permissions
- Update the application
- Open the handle’s settings and confirm Bluetooth is enabled
Avoid pairing the toothbrush directly through the phone’s standard Bluetooth menu unless the application specifically instructs us to do so.
How to Improve Brushing Coverage
Technology cannot compensate for rushing. Even with smart tracking, we need a repeatable route around the mouth.
Use the Same Route Every Time
For example:
- Begin with the outside of the upper-right teeth.
- Move across the upper front teeth.
- Continue to the upper-left side.
- Brush the inner surfaces of the upper teeth.
- Clean the upper chewing surfaces.
- Repeat the pattern on the lower teeth.
- Finish with the tongue if desired.
Following the same route reduces the chance of skipping awkward areas.
Spend Extra Time on Commonly Missed Areas
Pay attention to:
- The back surfaces of the final molars
- The inside of the lower front teeth
- The gumline
- Crowded or rotated teeth
- Areas around dental restorations
- Spaces beside orthodontic appliances
The smart charger may confirm that we visited a broad mouth zone, but our eyes and technique must still handle the fine details.
How to Clean the Oral-B iO Series 10
Cleaning the toothbrush after every use prevents dried toothpaste, unpleasant residue, and discolouration.
Cleaning the Brush Head
After brushing:
- Remove the head from the handle
- Rinse it thoroughly under running water
- Rinse around the opening underneath
- Shake away excess water
- Store it upright in open air
Do not seal a wet brush head inside a closed case for long periods.
Cleaning the Handle
Rinse the upper part of the handle carefully and wipe the exterior with a soft damp cloth.
Pay particular attention to the area around the metal shaft, where toothpaste can gather.
The handle is designed for wet bathroom use, but it should not be boiled, placed in a dishwasher, or cleaned with aggressive chemicals.
Cleaning the iO Sense Charger
Unplug the charger before thorough cleaning.
Then:
- Wipe it with a soft, slightly damp cloth.
- Remove dried toothpaste around the top surface.
- Dry it before reconnecting it to power.
- Never immerse the charger or power adapter.
Oral-B guidance notes that charging bases may be water-resistant enough for wiping or careful rinsing in certain models, but they should not be completely submerged.
Avoid Abrasive Cleaners
Do not use:
- Bleach
- Scouring powders
- Metal brushes
- Harsh bathroom sprays
- Abrasive sponges
- Boiling water
A soft cloth and regular maintenance are usually enough.
Using the Oral-B iO Series 10 With Braces
The small round head can be useful around brackets and wires, but brushing may require extra time.
Angle the head:
- Above the brackets
- Below the brackets
- Across the front surfaces
- Along the gumline
- Around the rear molars
Do not force the head against wires or attachments.
An interdental brush or flossing aid may still be required because a toothbrush does not clean every space between teeth.
Ask an orthodontist which iO brush head and cleaning routine best suit the appliance.
Using the Series 10 With Implants, Crowns, or Veneers
Many people with restorations can use an electric toothbrush, but the correct pressure and professional guidance matter.
Use:
- A gentle mode when appropriate
- Light pressure
- Slow movement around restoration edges
- A suitable brush head
- Interdental cleaning recommended by the dentist
The toothbrush can clean around a restoration, but it cannot repair looseness, inflammation, bleeding, or pain.
Report persistent symptoms promptly.
Common Oral-B iO Series 10 Mistakes
The Series 10 can coach us, but it cannot physically stop every bad habit.
Scrubbing Like a Manual Toothbrush
Rapid back-and-forth scrubbing fights against the brush’s intended action.
Guide it slowly instead.
Using Too Much Pressure
When the ring turns red, reduce pressure immediately.
Do not treat the warning as a challenge to push harder.
Moving Too Quickly
If we sweep across five teeth in two seconds, the head does not have enough contact time to clean each surface properly.
Pause briefly before progressing.
Brushing Only the Visible Surfaces
The front teeth receive plenty of attention because we can see them. The inner surfaces and rear molars are easier to neglect.
Use a fixed brushing route.
Ignoring the Brush-Head Reminder
A worn head may still spin, but its bristles cannot clean as effectively.
Replace it roughly every three months or sooner when visibly worn.
Leaving Toothpaste on the Handle
Dried toothpaste can build up around the shaft, buttons, display, and charger.
A quick rinse after every use prevents a larger cleaning job later.
How Long Should We Brush?
Two minutes is the standard target built into the toothbrush’s coaching system.
That means approximately:
- 30 seconds per quarter of the mouth
- One minute for the upper teeth
- One minute for the lower teeth
Some users may need slightly longer to clean around braces, implants, bridges, crowded teeth, or other complex areas.
Quality matters as much as duration. Four careless minutes are not necessarily better than two systematic minutes.
Should We Brush Before or After Breakfast?
Many dental professionals recommend brushing before breakfast or waiting after consuming acidic foods and drinks rather than brushing immediately.
Acid can temporarily soften the tooth surface. Brushing forcefully straight after orange juice, fizzy drinks, or other acidic foods may be unhelpful.
Personal needs vary, so follow advice from a dentist or hygienist, particularly when dealing with enamel erosion, reflux, sensitivity, or a high risk of decay.
How to Store the Toothbrush Properly
Store the handle and brush head upright in a ventilated area.
Avoid:
- Closed, damp cupboards
- Permanent contact with standing water
- Storing a wet head inside the travel case
- Allowing several brush heads to touch
- Wrapping the handle in a wet towel
When travelling, allow the brush to dry before closing the case whenever possible.
Travelling With the iO Series 10
Before a trip:
- Charge the handle fully
- Pack the compatible travel case
- Protect the brush head
- Check voltage and adapter requirements
- Disable unnecessary connected features if desired
- Keep the charger dry
The Series 10 can be used without the iO Sense base during a journey, making the travel setup much simpler.
When Should We Contact Oral-B Support?
Contact support or consult the model-specific manual when:
- The handle will not charge
- The display remains blank
- The toothbrush switches off unexpectedly
- The motor makes an unusual grinding sound
- The handle becomes excessively hot
- The charger appears damaged
- The pressure sensor never changes colour
- The brush will not pair after standard troubleshooting
- The battery performance declines suddenly
- There is a burning smell
The iO Series 7, 8, 9, and 10 handles are listed under Oral-B product type 3758 in official service resources. The four-digit type number can also be found on the underside of the handle.
Do not attempt to open a sealed handle or charger at home. Doing so may create an electrical hazard and affect warranty coverage.
Final Thoughts on Using the Oral-B iO Series 10
Learning how to use the Oral-B iO Series 10 does not require us to master every setting on day one.
Start with the basics:
- Charge the handle
- Attach an iO brush head
- Apply a small amount of toothpaste
- Select Daily Clean or Sensitive
- Place the brush against the teeth
- Turn it on
- Guide it slowly
- Follow the pressure sensor
- Complete the two-minute timer
- Rinse and dry the components
Once this routine feels natural, we can explore the iO Sense charger, application tracking, specialised cleaning modes, and personalised settings.
The smartest feature is not the display or the Bluetooth connection. It is the way the toothbrush encourages better habits. It reminds us to slow down, reduce pressure, and clean areas we might otherwise miss.
Used correctly, the Series 10 becomes less like a complicated gadget and more like a calm passenger giving directions. We remain in control; it simply helps us take a better route.
Frequently Asked Questions
1. How do we start the Oral-B iO Series 10?
Attach a compatible iO brush head, apply toothpaste, place the head against the teeth, and press the upper power button. Use the lower button beforehand if you want to change the brushing mode.
2. What does the red light mean on the Oral-B iO 10?
A red pressure-sensor light normally means we are pressing too hard. Reduce pressure and let the toothbrush perform the cleaning movement.
3. Can we use the Oral-B iO Series 10 without the app?
Yes. The toothbrush works without the mobile application. Its handle display, timer, pressure sensor, and iO Sense charger provide useful guidance independently.
4. Can we use regular Oral-B brush heads on the iO Series 10?
No. The iO Series 10 is designed for Oral-B iO-compatible brush heads. Older Oral-B head designs are not intended to fit the iO drive system.
5. How often should we replace an Oral-B iO brush head?
Replace it approximately every three months, or earlier if the bristles become frayed, bent, faded, or ineffective.